Creating a privacy and security culture within your organization is fundamental! Upload your Users and give them roles to provide them with the right permissions and Accountability. This way they can easily collaborate with you and your colleagues.
Uploading new users can be achieved in two ways:
- Adding them individually;
- Uploading them in bulk using the provided excel template.
Adding an individual user
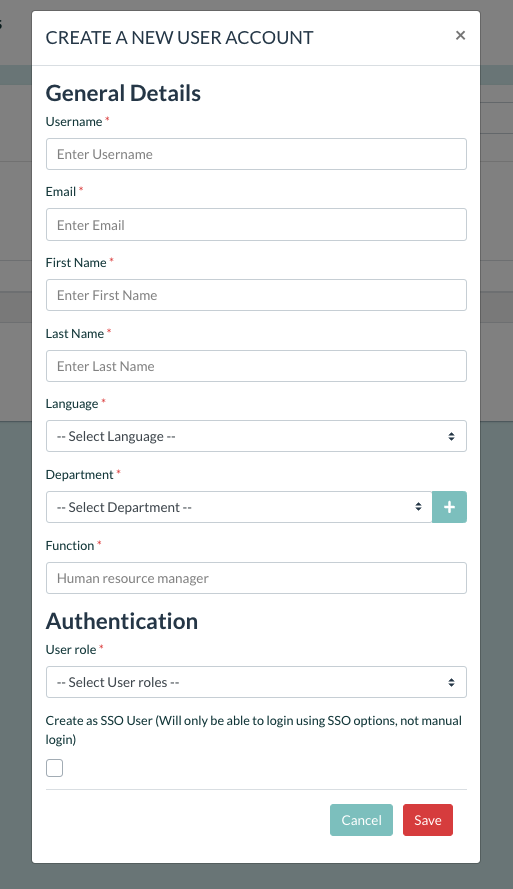
- Click ‘Add user’
- Fill out all the mandatory fields:
- Username
- First Name
- Last Name
- Language
- Department
- Function
- User role (This will be the role they start out with, once added, more options will be available)
- The create as SSO user option allows the creation of a user who can only login using their Corporate Microsoft or Google account. More information about this can be found here for Microsoft and Google.
- Click ‘Save’.
- The user will be listed in the user overview and they will receive an invite to set-up their account to gain access to RESPONSUM.

Adding multiple users with the upload
- Click ‘Upload Users’
- Click ‘Download template’ This will download the template with example data of how to upload new users.
- Open the template.
- Fill out all the mandatory fields:
- Username
- First name
- Last name
- Roles
- Department
- Company function
- Language
- The “SSO-Only user?” option allows the creation of a user who can only login using their Corporate Microsoft or Google account. More information about this can be found here for Microsoft and Google.
- Save the file as a xls, xlsx or CSV filetype.
- Upload the file by dropping it in the upload field or by browsing your computer.
- Click ‘Submit file’
- The users will be listed in the user overview.
User Management
Once on the user overview page, you will be able to interact with an individual user or users in bulk to perform actions. If you click through on a user, you will find:
- Possibility to update user information;
- Ability to reset the user password;
- Ability to enforce two-factor authentication for that user;
- Ability to enable two-factor authentication (for your own user only);
- Ability to generate an API key that can be used to access RESPONSUM public API’s;
- Show a log of the role changes that have occurred for the user over time;
- Set the roles for the user.
Managing User Role(s)
- Click on a user in the user overview.
- Click on the ‘edit’ button next to ‘Role(s)’.
- Click ‘Add user role’.
- Super Administrator: User who has full access to the entire environment and can configure RESPONSUM fully.
- Administrator: User who can manage RESPONSUM parameters and access.
- Power User: User who can be appointed certain Permissions within RESPONSUM, can be made Accountable and can see all details or a subset of details filtered on departments or offices.
- User: User who can be appointed certain limited permissions to create items in RESPONSUM to be checked or extended by a Power User.
- Employee: User who has Employee Portal access. An employee gets limited access to RESPONSUM for following E-learnings, being part of a phishing campaign etc.
- Click ‘Save and exit’ to go back to the user configuration screen.
- Click ‘Save’.
