
You are able to create identified risks within the risk register, as well as during risk assessments such as a TIA or DPIA.
Add an identified risk – to the risk register
STEP 1: IMPACT & PROBABILITY
- Go to Risk Management > Risk Register
- Click “+ Add identified risk”
- Fill in the risk name
- Select a general risk from the risk dictionary or create a new one by clicking on the plus sign.
- Select the probability and impact level
- Add a linked item if applicable
- Add the risk source. What is the origin of the risk? Human, natural,…
- Is there a responsible user or a responsible external person? In case of a user, select a user from the drop-down menu. In case of an external person, write down his/her name.
- Click “Save as Draft”
- Click on the right-pointing arrow to go to the next page
STEP2: THREATS AND VULNERABILITIES
- A threat is defined as a potential source of harm or adverse impact to a system, asset, or individual. Threats can be natural, accidental, or deliberate in origin, and can take many forms, such as cyber attacks, fires, earthquakes, or human error.
- Click “+ Add a threat”
- Enter a name and description
- A vulnerability is a weakness or gap in a system’s defenses that can be exploited by a threat to cause harm. For example, a vulnerability in a computer system could be a software bug or an unpatched security hole, which a cyber attacker could use to gain unauthorized access to sensitive data.
- Click “+ Add a vulnerability”
- Enter a name and description
STEP3: RISK TREATMENT
- Select how you want to deal with the risk. If your risk-handling method is not in the list, click on the “+” sign to create a new one.
- Describe the method
- Select one or more controls and/or measures that you want to apply to handle the risk. If you want to add a new one, click on the “+” sign, select a measure or sub-control, and fill in the form.
- Select the residual risk after the implementation of your handling methods.
- Click “save as draft” or “submit”
- You have now added a new risk to the risk register!
Manage risk linked to a risk assessment (TIA/DPIA)
Whether you perform a TIA or DPIA, you always follow the same steps:

RISK IDENTIFICATION
You start with identifying a general risk followed by specifying/assessing it for the case that you are working on. See article “How to: add a (general) risk”

RISK ASSESSMENT
Then you assess the general risk for this specific case:
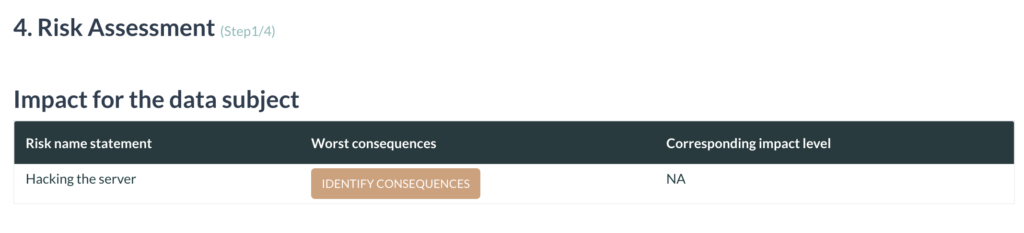
- Impact for the data subject
- Click “Identify consequences” for each risk
- A list divided into three topics will appear: select ‘Material’, ‘Physical’ and/or ‘Moral’ consequence(s), by ticking the box
- Click ‘Save’
- Click on the right-pointing arrow the continue
- Probability that the risk will occur
- Select for each consequence a probability score
- Click on the right-pointing arrow the continue
- Risk Calculation (Calculated)
- You will receive a calculated risk level for each consequence
- Click ‘Next’
- Risk calculation (manual alternations)
- Alter the risk level manually if justifiable
- Fill out the justification field for each alteration
- Click ‘Next’
RISK HANDLING/ACTION PLAN
- Exceptions and potential obligations
- Select the risk handling method from the ‘Risk handling’ list or click the “+” sign in case you want to add a new handling method.
- Provide an explanation and description of the chosen method
- Add measures to accomplish the method, by clicking on ‘view or edit measure’. Create the measure by filling out the name or selecting it from the drop-down menu, link the related IM System, appoint it to a specific RESPONSUM user and specify a deadline, by selecting a date in the box
- Click ‘add’
- Exceptions and potential obligations
- This is an overview of your risks, handling methods, and the links measures
RESIDUAL RISK
- Select what risk is still left after the implementation of the measures to prevent the risk from happening.
- Click “save as draft” or “submit”